Showing posts with label tutorial. Show all posts

Wednesday, October 22, 2014

Tutorial: Wheelpoint Earrings


You will need (one unit per each item):
6/0 lustered ivory rocaille
8/0 lustered gold-brown rocaille
6mm white travertine wheel beads
2 ear hooks

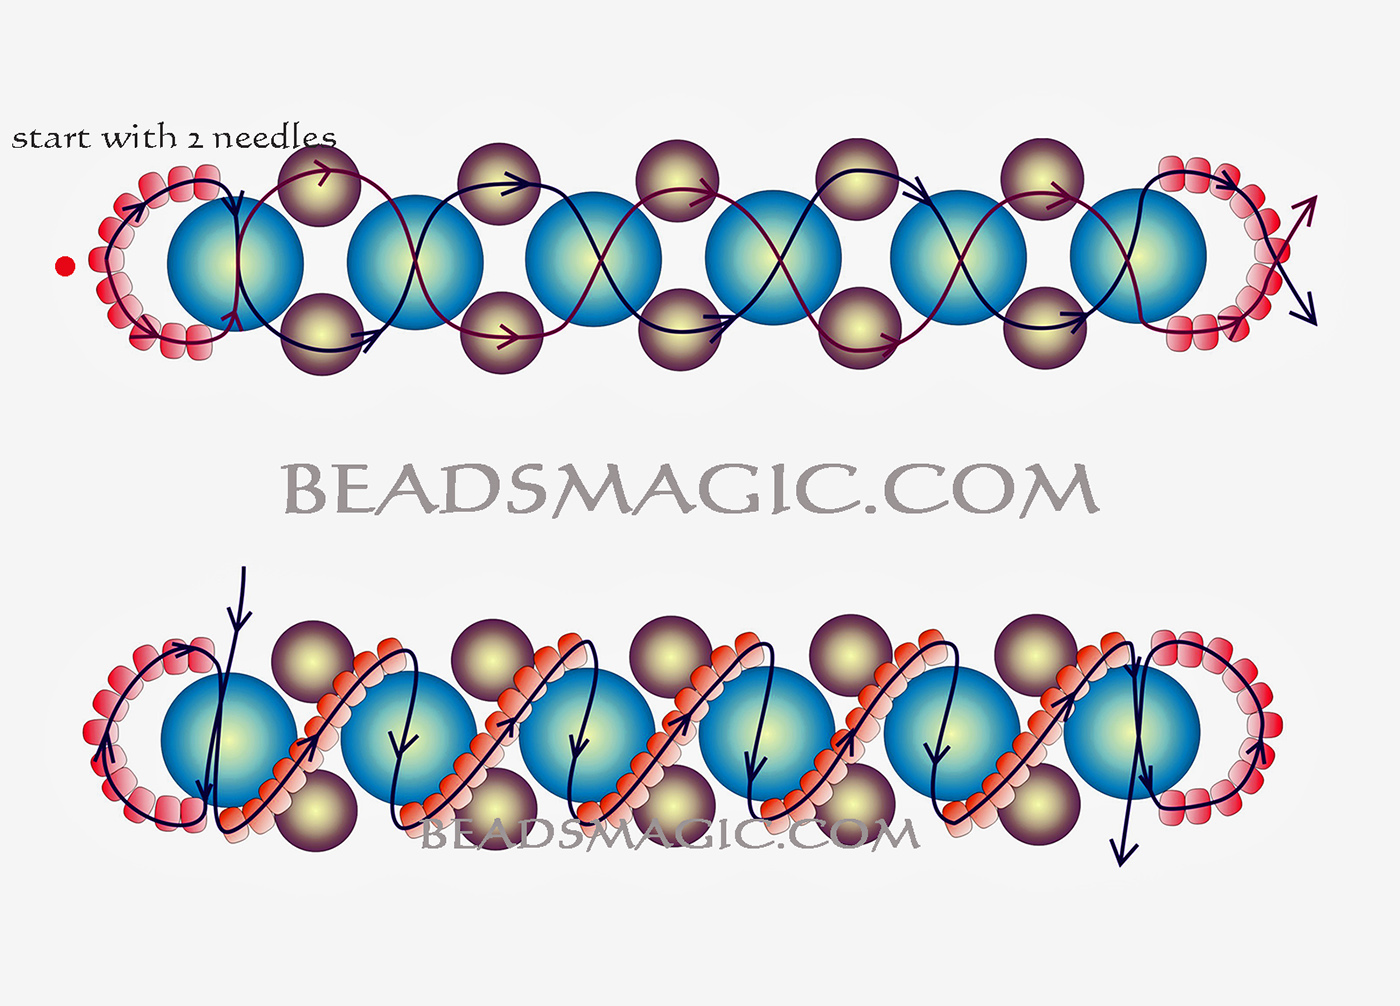
1. String one 8/0 bead, one 6/0 bead and repeat it five times. You’ll get 12 beads on the thread.

2. Pass the thread through the first bead and tie the strung seed beads into a circle. Pass the thread through a few beads. Thread should appear from 6/0 bead.

3. String one wheel bead, one 6/0 rocaille and one wheel bead. Pass the thread through 6/0 rocaille bead that is opposite to the bead you have started with. Pass thread through wheel-rocaille-wheel beads back, pass through 6/0 rocaille you have started with and pass through the circle till 8/0 rocaille, which became of top of the figure (see the picture).

4. It should look like this! The first element is finished.

 
5. String 6/0, 8/0 and 6/0 rocailles, pass the thread through the bead you have started with and tie the strung seed beads into a circle. Pass the thread to the top bead of this circle.

6. String two 8/0 beads, ear hook and two 8/0 beads and pass the thread through the beads you have started with.


7-10. Pass the thread through the beads according to pic.7-10. The thread should appear at the red point.

11. String three 8/0 beads, pass the thread through the bead you have started with  and tie the strung seed beads into a circle.

12. Fix the thread and hide its ends. Earring is ready!

 
Tutorial is provided by Birgit Kowollik

Sunday, August 24, 2014

Projects for PIP beads

We would like to offer you some projects from Preciosa. Use PIPs to create gorgeous fashion jewelry!


Monday, August 18, 2014

Tutorial: Stud Earrings with Connector Beads

Pearl Blay, who helps us with giveaway at the Beading Gem's Journal, offers you simply and clear tutorial. Take a look at her blog and you'll find out, how to make elegant earrings with 30mm silky ruby bugle beads.


Sunday, August 10, 2014

Neon Pendant Tutorial


You will need:
7/0 neon matt pink rocaille
7/0 neon matt green rocaille
11/0 black rocaille
8/0 black or jet rocaille
15x9 black daggers
6 yards of beading thread


1. On 2 yards of thread, string four 11/o seed beads, then add one 11/o, one 8/o, one green 7/o, one 8/o and one 11/o. (This 5 bead pattern will repeat for the remainder of the rope.) Stitch up through the first 4 beads added and pull snug.

2. Pick up one 11/o bead and the 5 bead pattern. Stitch up through the four core beads again and pull snug. Stitch up through the first 11/o bead added in this step.

3. Pick up one 11/o and the 5 bead pattern. Stitch up through the top four beads in the core section. Pull snug and stitch up through the first 11/o added.

4. Repeat step 3 to form a spiral rope that is just long enough for the ends to meet and form a ring about 2 inches in diameter. Stitch the ends together by passing up through the first 4 core beads and pull tight. Zip up the ring by adding more 5 bead stitches to complete the spiral until all of the core beads are covered and the spirals meet. Weave in any remaining thread and trim.

5. Use ladder stitch to create a 2 by 4 bead strip of 8/o seed beads. Stitch the first and last stacks together securely and exit from the bottom, or tail side, of the beadwork.

6. Pick up a repeating pattern of pink 7/o and black 8/o beads to make a strand 2-4 inches long. Pick up six 11/o, one dagger, and six 11/o. Stitch back up through the pink and black strand and the bead ladder. Pull snug.

7. Stitch down through the next stack of the ladder and add another fringe. Repeat to make 4 fringes in total, and exit from the top of the bead ladder.

8. Pick up one pink 7/o and twenty five 11/o. Pass through the center of the spiral ring, and stitch back through the pink bead, and into the opposite side of the ladder. Weave in any remaining thread, passing through the loop and securing the base 7/o bead to the ladder. Secure the thread with a half hitch knot in one of the fringe strands and trim.

9. Repeat steps 5-8 to form a second fringe tassel. String pendant as desired for a fun necklace.


 Tutorial is provided by Mortira Natasha vanPelt

Wednesday, August 6, 2014

Monday, July 28, 2014

Gypsy Bracelet Tutorial

You will need (one unit per each item):
Black, White, Violet, Aventurine Lampwork Flat Circle 25mm
11/0 Transparent Violet Rocaille Seed Beads
10/0 Iris Magenta Rocaille Seed Beads
Light Violet and Clear Diamonds 9x8mm
Alexandrite Picasso Props 8x6mm
White with Purple Haze Full Coating Faceted Rounds 4mm
Clear with AB, Brown and Pearl Coatings Faceted Rounds 6mm
Fuchsia Leaves 12x7mm
Purple Haze Leaves 12x7mm
Copper Twisted Ovals 9x6mm
Magic Blue Round 8mm

Working with pleated silk shibori ribbon and bead embroidery is becoming increasingly more popular.  Here's how you can get started, making a free-form cuff bracelet.  No two pieces will ever turn out exactly the same when you work in this style, but as you follow through the instructions here, you will see all the basic steps that will give you success in working with this beautiful material. (Stitch instructions may be found in free e-book chapter of Every Bead Has a Story by Cyndi Lavin)

Step 1
Choose a metal cuff and create a paper pattern from it (just as a rough guide).  I have added a thin layer of cotton batting to my cuff with adhesive, but this is optional.  Cut a piece of foundation fabric that is at least 1/2 inch bigger on each side than your pattern.  Iron a lightweight piece of fusible interfacing to the back of the foundation fabric. 


Step 2
Trace around your paper pattern on the interfacing side.  This is still just a rough guide: you can bead well past this edge if you wish, and in any event, the piece is likely to shrink up a bit from your stitching as you work (hence the extra fabric around the edges).


Step 3
Use pins on the front to roughly mark out the area for ribbon placement.


Step 4
Play with the ribbon, letting it loop and fold and fan out until you are satisfied with the arrangement.  Roll under the edges and take tiny stitches all around the outside.  Also take some stitches in the middle to keep the ribbon where you want it.  Usually I would use white thread, but I wanted you to be able to see it.  The edges will be covered later and any interior stitches that show can also be covered by beads.


Step 5
Here is what my ribbon looks like before bead embellishment begins.


Step 6 Stitch a peyote stitch bezel around your focal bead or cabochon.


Step 7
Outline one edge of the ribbon using back stitch, and adding occasional accent beads if desired.


Step 8
Stitch along the other long edge, and begin adding decorative stitching to each edge as desired.  Use the pattern drawn on the back as a rough guide for your beading, but don't be afraid to extend it past the edge.


Step 9
Add back stitched beads judiciously to the folds of the shibori ribbon.  Try to avoid over-embellishing, but do cover any tacking stitches that show.


Step 10
Bead across the short edges at each end of the bracelet.


Step 11
Trim the top carefully, leaving a margin around the edge for adding a beaded edge.  Use adhesive or tape to temporarily attach the top to the metal cuff.  Add a piece of ultra-suede fabric to the back and cut it to match the top.  Baste the two fabric pieces together temporarily, stitching as close to the edge of the metal cuff as you can.


Step 12
Using edging brick stitch, add a beaded border the entire way around the edge of the cuff.  I used size 10/0 seed beads.


Step 13
Add a short stack stitch to each edging stitch.  I used size 15/0 seed beads for this.


Bracelet is finished!


Tutorial is provided by Cyndi Lavin

Monday, July 7, 2014

Totally Tutorials exchange program

Hi everybody!

We would like to invite you to take part in our new project with Totally Tutorials exchange program :) We look for a beadworkers who are interested in making a jewellery tutorial using our beads. We offer you three items: 10mm black flat circles (30 pieces) and 6.5x3.2mm neon green and neon yellow farfalle beads (25g per item):
https://www.etsy.com/listing/153624320/25g-200pcs-neon-yellow-farfalle-czechhttps://www.etsy.com/listing/107807619/30pcs-black-flat-circles-czech-pressedhttps://www.etsy.com/listing/153624188/25g-200pcs-neon-green-farfalle-czech
We'll send you these items for free. We belive, you'll create something amazing and let us publish your tutorial at our blog :)

We don't limit you in using your own materials, if you need them.

HOW TO GET IN:
- you should share information about this giveaway at your blog
- you should leave comment to this entry including your name and link to your blog, where you publish information about this project, and your email adress (you can write it in form example [at] example.com )

We'll randomly choose up to five winners and publish their names July 14th.

Good luck!

Thursday, March 6, 2014